| What a wonderful hat:) Thanks to John Brinegar for this pattern 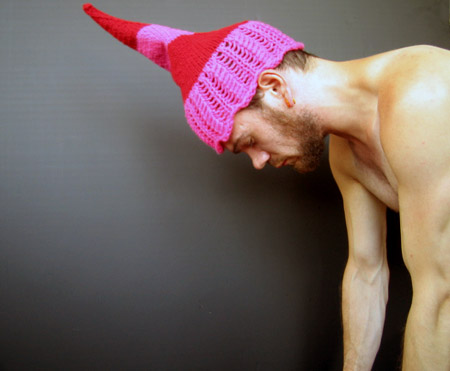  |
| SIZE |
| One [stretch to fit from child to large adult] |
| FINISHED MEASUREMENTS |
| Length: Approx. 17 inches Circumference: 16 inches |
MATERIALS |
 Gedifra Donatella [80% New Wool, 20% Polyamide; 72yds/65m per 50g ball] Gedifra Donatella [80% New Wool, 20% Polyamide; 72yds/65m per 50g ball][MC]: Color: #2056 Hot Pink; 1 ball [CC]: Color: #2204 Red; 1 ball 1 set US 10/6mm straight needles Cable needle Tapestry needle |
| GAUGE |
| 13.5 sts/20 rows = 4 inches in stockinette stitch |
| PATTERN NOTES |
K1 below: When knitting next stitch, insert needle knitwise into center front of stitch BELOW next stitch on left needle. Knit this stitch as usual, dropping stitch on left needle from left needle when the new stitch is complete. Loop Lace Pattern (Worked over a mutliple of 6 sts + 5): Row 1 [RS]: Sl 1, k2, k2tog, yo, [k1 below, yo, k2tog, k1, sl 1, k1, psso, yo] to last 6 sts, k1 below, yo, k2tog, k3. Row 2 [WS]: Sl 1, sl next st to cable needle and hold to back of work, p2, p1 from cable needle, p3, [sl next st to cable needle and hold to back of work, p2, p1 from cable needle, p3] to last 4 sts, sl next st to cable needle and hold to back of work, p2, p1 from cable needle, k1. Repeat these 2 rows for Lace and Cable Pattern. |
| IRECTIONS |
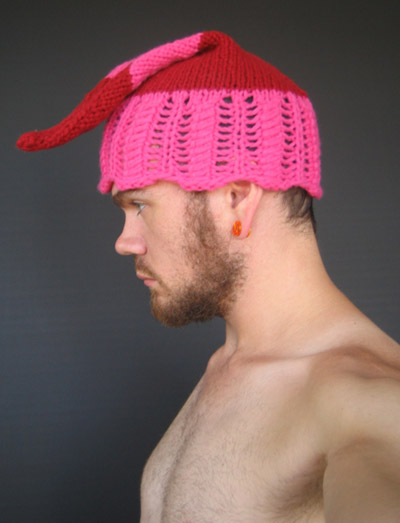 Note: Slip first st of each row purlwise. Note: Slip first st of each row purlwise.Using MC, CO 59 sts. P 1 row [WS]. Work 21 rows in Loop Lace Pattern, ending with RS row. P 1 row. Using CC, work 2 rows in stockinette st, and cont as follows: Decrease Row [RS]: Sl 1, ssk, k to last 3 sts, k2tog, k1. P 1 row. Repeat these 2 rows 7 times more. Work Decrease Row once more. 41 sts rem. Using MC, p 1 row. Work Decrease Row. Repeat these 2 rows 6 times more. 27 sts rem. Using CC, p 1 row. Work Decrease Row. Repeat these 2 rows 10 times more. 5 sts rem. P 1 row. Next row [RS]: Sl 1, ssk, k2tog. P 1 row. Break yarn, leaving a tail at least 2 feet long; draw tail through rem sts, pull tight. FINISHING Use tail to sew hat together along long edge. Weave in ends. Source:knitty.com If you like handmade, knit and crochet creations please visit my shop |
free pattern etiketine sahip kayıtlar gösteriliyor. Tüm kayıtları göster
free pattern etiketine sahip kayıtlar gösteriliyor. Tüm kayıtları göster
13 Şubat 2012 Pazartesi
Free Knit Pattern, Pinky Man Hat

24 Ekim 2011 Pazartesi
Free Knit Pattern Slippers Socks
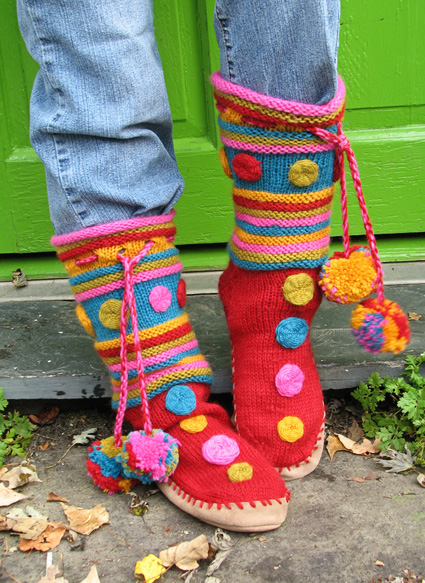
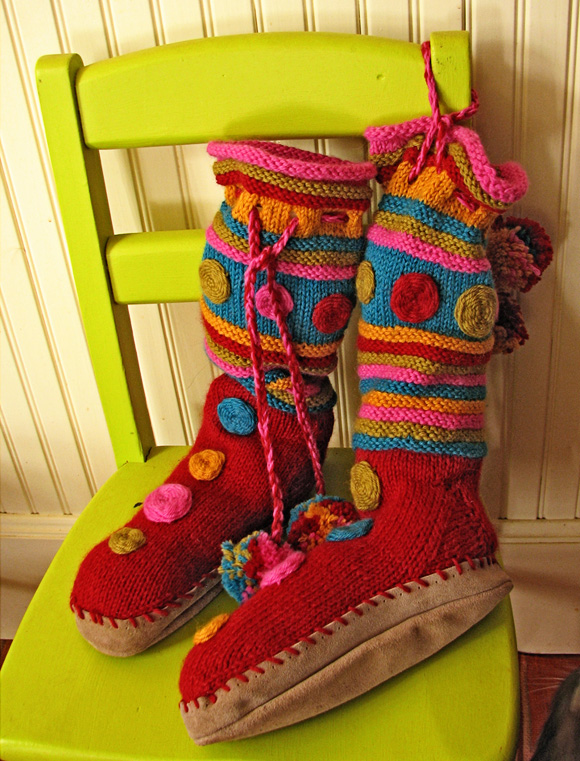
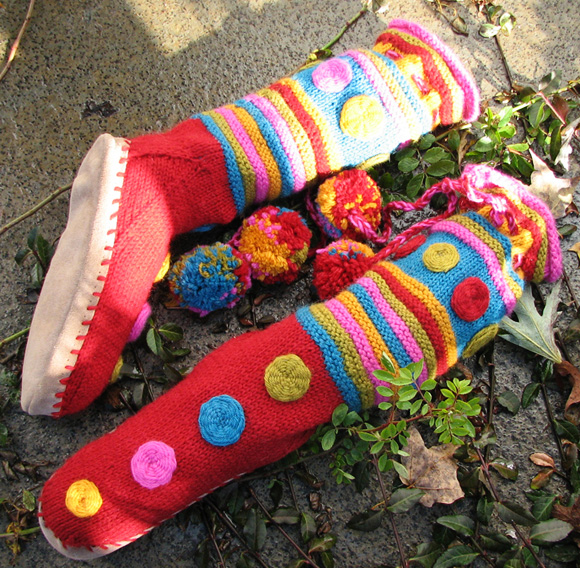
This slippers socks are superb:) Thanks Kristin Nicholas for this pattern.
 | |
| SIZE S[M, L] To fit Woman's Small/Medium [Woman's Medium/Large, Men's Medium] |
 |
| FINISHED MEASUREMENTS Foot Circumference: 8[8.75, 9.5] inches Leg Circumference: 9.25[10, 11] inches, unstretched Leg Length: 10.5 inches |
|
| MATERIALS Yarn Nashua Handknits Julia [50% wool, 25% alpaca, 25% mohair; 93yd/85m per 50g skein]  [A] #2624 Fuchsia; 1 skein [B] #3961 Lady's Mantle; 1 skein [C] #6085 Geranium; 2 skeins [D] #1054 Sunflower; 1 skein [E] #4726 Maine Coast Blue; 1 skein [A] #2624 Fuchsia; 1 skein [B] #3961 Lady's Mantle; 1 skein [C] #6085 Geranium; 2 skeins [D] #1054 Sunflower; 1 skein [E] #4726 Maine Coast Blue; 1 skeinRecommended needle size [always use a needle size that gives you the gauge listed below -- every knitter's gauge is unique] 1 set US #6/4 mm double-point needles 1 set US #7/4.5mm double-point needlesTools Yarn needle Safety pin or split ring marker 1 pair suede slipper bottoms, to fit wearer 1 crochet hook, approx. size US #8/H / 5mm Pompom maker, approx. diameter 2.25 inches (optional) |
|
| GAUGE 20 sts/24 rounds = 4 inches in stockinette st using smaller needles 19 sts = 4 inches in Ridge pattern using larger needles |
|
| PATTERN NOTES |
| The leg of this sock is worked using a larger needle, for a slouchy fit. When slipping sts, slip st purlwise with yarn held to WS of work. skp: Sl 1 knitwise with yarn held to back of work, k1, pass slipped st over st just knit. 1 st decreased. Ridge: K 1 round. P 2 rounds.
|
|
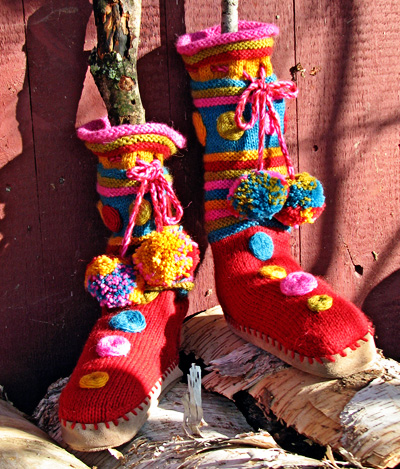
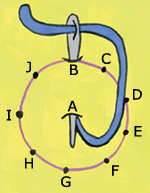
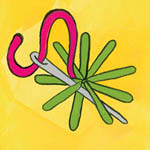
| FINISHING Weave in ends. Embroidery Using photos as guides, work spider web embroidery on foot and on stockinette st section of leg. Note: It is important to use a blunt tip needle for spider web stitch -- a pointed needle is difficult to use because it will pierce the thread you are weaving on. You can also use the back end of a sharp pointed needle to weave.
CORD The cord can be either knitted or crocheted. Crocheted Method: Using 1 strand each of A and C held together, work a crochet chain approx. 30 inches long. Make a second tie in the same way. Knitted Method: Using 1 strand each of A and C held together, CO 60 sts, then BO all sts. Make a second tie in the same way. Using photos as guides, thread ties through eyelets. Using pompom maker, make 4 pompoms. Attach to ends of ties. Using desired color and whip stitch, sew slipper feet into suede slipper bottoms. Source:knitty.com If you like handmade, knit and crochet creations please visit my shop |

16 Ekim 2011 Pazar
Free Knit Pattern, Winter Shrug
This cozy shrug is fabulous!
Thanks to Asley Adams for this pattern.
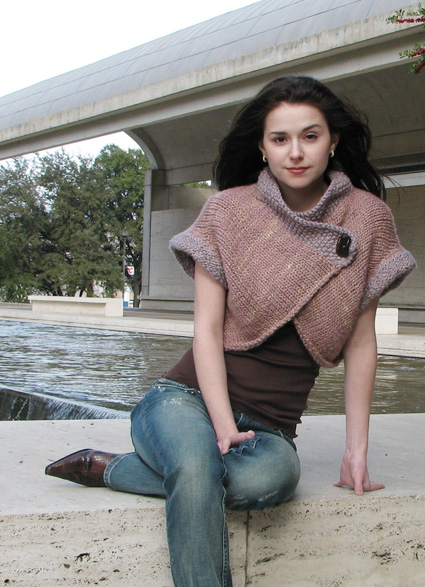
Source:knitty.com
If you like handmade, knit and crochet creations please visit my shop
Thanks to Asley Adams for this pattern.
| SIZE | |
| XS/S [M/L, 1X/2X, 3X/4X] (shown in size XS/S) | |
| FINISHED MEASUREMENTS | |
| Chest: 32[40, 48, 56] inches Length (from back neck): 17.5[18.5, 19.5, 20.5] inches | |
| MATERIALS | |
 Artfibers Triple Cheesecake [30% silk/70% Extrafine Merino Wool; 52 yards/47.5m per 100g cone (available in multiple cone sizes)]; color # 4; 700[950, 1200, 1500]g Artfibers Triple Cheesecake [30% silk/70% Extrafine Merino Wool; 52 yards/47.5m per 100g cone (available in multiple cone sizes)]; color # 4; 700[950, 1200, 1500]gNote: For those who wish to us a contrast color for the collar and sleeves, the required yarn amounts are as follows: MC: 600[800, 1000, 1250]g CC: 200[300, 350, 450]g Recommended needle size: 1 set US #11/8.0mm straight or circular needles 1 set US #13/9.0mm straight or circular needles[always use a needle size that gives you the gauge listed below -- every knitter's gauge is unique] Stitch holders Safety pins Crochet hook, close in size to US #15/9mm (exact size is not important) Tapestry needle Button | |
| GAUGE | |
| 9.5 sts/14 rows = 4 inches in stockinette st after blocking, using larger needles 10.5 sts/16 rows = 4 inches in Seed Stitch after blocking, using smaller needles | |
| Short row tips: Knitting wraps together with sts: Insert right needle under wrap as if to k, then into wrapped st; k wrap together with st. Purling wraps together with sts: Insert right needle into wrapped st, then under wrap as if to p; p wrap together with st. Selvedge Stitches: When instructed to work selvedge sts, work them as follows: On RS rows: Sl first st purlwise. K last st. On WS rows: Sl first st knitwise. P last st. This will create one ‘selvedge knot’ for every two rows along the edge of work, which will help with with seaming and picking up sts. Seed Stitch (Worked over an even number of sts): Row 1 [RS]: [K1, p1] to end. Row 2 [WS]: [P1, k1] to end. Repeat these 2 rows for Seed Stitch. Ssp: Slip next 2 sts knitwise, one at a time, to right needle. Slip them both, purlwise, back to left needle. Purl them together through their back loops. | |
| DIRECTIONS | |
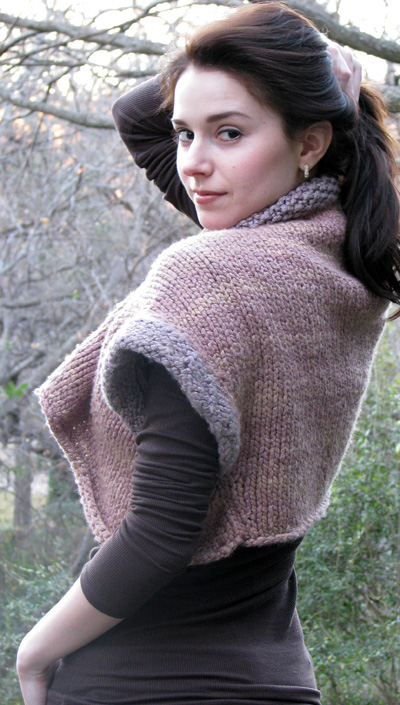  BACK BACKUsing larger needles, CO 36[46, 54, 64] sts. Working selvedge sts as directed in Pattern Notes, work 4[6, 4, 4] rows in stockinette st, ending with a WS row. Note: Continue working selvedge sts as set until otherwise directed. *Increase Row 1 [RS]: Sl 1, k1, m1, k to last 2 sts, m1, k2. Work 5 rows in stockinette st. Work Increase Row 1. Work 3[3, 5, 5] rows in stockinette st.* Repeat from * 3 times more, then work Increase Row once more. 54[64, 72, 82] sts. Work 5[7, 5, 7] rows in stockinette st, ending with a WS row. 50[54, 58, 60] rows have been worked; work measures approx. 14.5[15.75, 16.75, 17.25] inches. Work Increase Row 1. P 1 row. Increase Row 2 [RS]: Sl 1, [k1, m1] twice, k to last 3 sts, m1, k, m1, k2. 60[70, 78, 88] sts. P 1 row. [Work Increase Row 1. P 1 row] twice. 64[74, 82, 92] sts. Work Increase Row 2.68[78, 86, 96] sts. P 1 row. 60[64, 68, 70] rows have been worked; work measures approx. 17.5[18.5, 19.5, 20.5] inches. 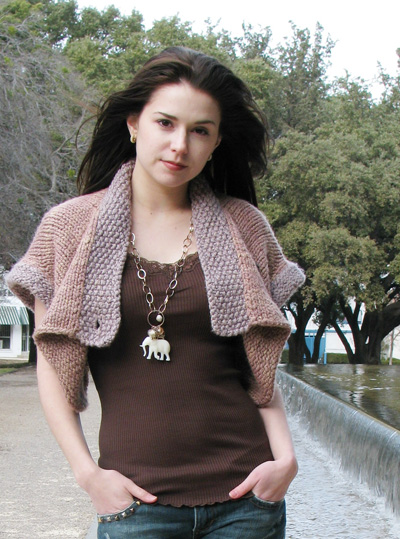 LEFT FRONT LEFT FRONTNext Row [RS]: Sl1, k1, m1, k20[23, 26, 30], place 23[26, 29, 33] sts just worked on st holder for right front; k next 24[28, 30, 32] sts and place them on a second st holder for back neck; k to last 2 sts, m1, k2. 23[26, 29, 33] sts. P 1 row; CO 1 st at end of this row. 24[27, 30, 34] sts. Next Row [RS]: Sl 1, k to last 2 sts, m1, k2. Work 1[3, 1, 3] rows in stockinette st. **Next Row [RS]: Sl 1, k to last 3 sts, m1, k1, m1, k2. Work 1[1, 3, 3] rows in stockinette st. Next Row [RS]: Sl 1, k to last 2 sts, m1, k2. P 1 row. Repeat these 2 rows once more.** Repeat from ** to ** 3 times more. 41[44, 47, 51] sts. Work 0[2, 0, 2] rows in stockinette st. 88[96, 104, 110] rows have been worked; work measures approx. 25.5[28, 30, 32] inches. Shape Lower Edge: Row 1 [RS]: Sl 1, k to last 4 sts, [k2tog] twice. Slipped selvedge sts will no longer be worked at side edge. 39[42, 45, 49] sts. Row 2 [WS]: BO 1 st, p to end. 38[41, 44, 48] sts. Row 3 [RS]: Sl 1, k to last 2 sts, k2tog. 37[40, 43, 47] sts. Row 4 [WS]: BO 2 sts, p to end. 35[38, 41, 45] sts. Row 5 [RS]: Work as for Row 3. 34[37, 40, 44] sts. Row 6 [WS]: BO 3 sts, p to end. 31[34, 37, 41] sts. Row 7 [RS]: Work as for Row 3. BO remaining 30[33, 36, 40] sts. RIGHT FRONT Place 23[26, 29, 33] held sts of right front on needles with WS facing and rejoin yarn at neckline edge. CO 1 st and p to end. 24[27, 30, 34] sts. Next Row [RS]: Sl 1, k1, m1, k to end. Work 1[3, 1, 3] rows in stockinette st. **Next Row [RS]: Sl 1, [k1, m1] twice, k to end. Work 1[1, 3, 3] sts in stockinette st. Next Row [RS]: Sl 1, k1, m1, k to end. P 1 row. Repeat these 2 rows once more.** Repeat from ** to ** 3 times more. 41[44, 47, 51] sts. Work 0[2, 0, 2] rows in stockinette st. 88[96, 104, 110] rows have been worked; work measures approx. 25.5[28, 30, 32] inches. Shape Lower Edge: Row 1 [RS]: BO 2 sts, k to end. Slipped selvedge sts will no longer be worked at side edge. 39[42, 45, 49] sts. Row 2 [WS]: Sl 1, p to last 2 sts, ssp. 38[41, 44, 48] sts. Row 3 [RS]: BO 2 sts, k to end. 36[39, 42, 46] sts. Row 4 [WS]: Work as for Row 2. 35[38, 41, 45] sts. Row 5 [RS]: BO 3 sts. 32[35, 38, 42] sts. Row 6 [WS]: Work as for Row 2. BO remaining 31[34, 37, 41] sts. 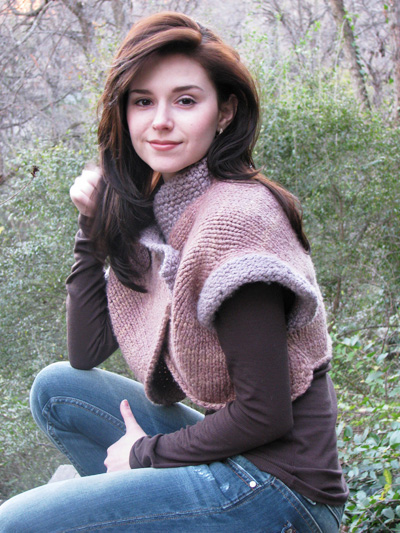 SLEEVES SLEEVESThe selvedge sts will have created knots along the side edges of the garment, each knot representing 2 rows of work. Count 6[7, 7, 8] knots in from each end of one side edge, and use a safety pin to mark these knots. There will be 32[34, 38, 39] knots between marked knots. With WS facing, using larger needles and beginning with knot next to marked knot, pick up and k 47[52, 56, 59] sts along edge between pins; this will be approx. 3 sts for every 4 rows. Row 1 [RS]: K all sts. Row 2 [WS]: P all sts. Row 3 [RS]: K to last 4 sts, W&T. Row 4 [WS]: P to last 4 sts, W&T. Row 5 [RS]: K to last 8 sts, W&T. Row 6 [WS]: P to last 8 sts, W&T. Row 7 [RS]: K to last 12 sts, W&T. Row 8 [WS]: P to last 12 sts, W&T. Row 9 [RS]: K to last 16 sts, W&T. Row 10 [WS]: P to last 16 sts, W&T. Row 11 [RS]: K to end, working wraps together with wrapped sts. Row 12 [WS]: P all sts, working wraps together with wrapped sts. Row 13 [RS]: K all sts. Fold sleeve in half towards RS, forming a sleeve ‘roll’ with WS facing. Use crochet hook to pull each live st, one at a time, through from RS to WS, pulling each st through selvedge in the same space in which it was originally picked-up. Being careful not to drop, place each st on smaller needle as it is pulled through. When all sts have been pulled through to WS and sleeve ‘roll’ has been closed, use larger needle to BO all sts. COLLAR Using smaller needle with WS facing, pick up and k 1 st in each knot along vertical neckline edge; place held sts of neckline on needle and p these sts; pick up and k 1 st in each knot along remaining vertical neckline edge (be sure you have picked up the same number of sts as along the first vertical edge). Approx. 84[92, 98, 102] sts. Note: Don't worry if you get a different number of sts. The important thing is to pick them up as directed. Work 4 rows in Seed Stitch. Buttonhole Row 1 [RS]: Work 3 sts in pattern, BO 2 sts, work in pattern to end. Buttonhole Row 2 [WS]: Work in pattern to bound-off sts, CO 2 sts, work in pattern to end. Work 6 rows in Seed Stitch. BO all sts knitwise with WS facing. 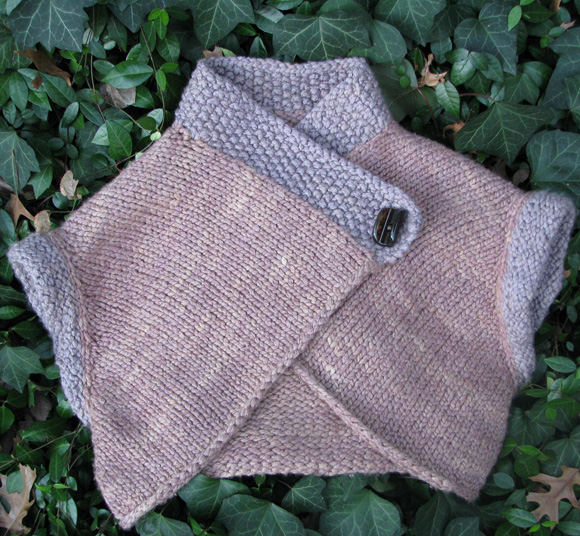 | |
| FINISHING | |
Block garment to measurements shown in schematic. Sew side edges together below sleeves, as shown in schematic. Weave in ends. Try on garment to determine best button placement, and sew on button. 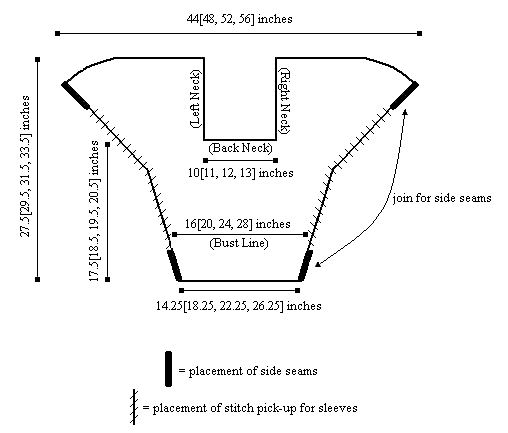 | |
Source:knitty.com
If you like handmade, knit and crochet creations please visit my shop
Kaydol:
Kayıtlar (Atom)